Sunday, April 29, 2012

Pizza Party

Last weekend I had a few friends over for dinner.  We made homemade pizzas for dinner using store bought whole wheat crust, doctored up tomato sauce, and a variety of toppings I had picked up from the grocery store. There were four people, so we made two pizzas and each created a half.

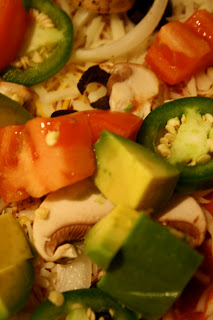
The first pizza had a stark divide.  One half was cheese (and a carrot) and the other half had a variety of toppings including onion, tomato, mushrooms, jalapenos, olives, avocado, and asparagus.


Here's a close up of the toppings:


And here's the finished version:


The other pizza ended up having a strip of cheese dividing the two halves of the pizza.  On the left there were mushrooms, olives and asparagus.  On the right you can see tomatoes, mushrooms, and asparagus.

 After baking, fresh avocado was added to one half of the pizza after baking.  This prevented the avocado from turning brown in the oven. Here's the final product:


Which pizza looks best to you?  Can you guess which one I made?


Easy weeknight dinners

If you're following my blog (...hi Mom), you might think that I cook real food every day of the week.  That simply isn't true, so here's an idea of some easy dishes I've had lately. 

 First up we have pita pizza.  This is the slightly grown-up version of the English muffin pizza that we all learned how to make in middle school.  Basically, you slice open a pocket pizza and then add tomato sauce, cheese, and toppings as you would to any pizza.  Bake in the oven at 400 degrees for a few minutes, and voila, dinner is ready.


Next up is eggplant pasta.  While the lighting in this picture is horrible, the food actually tasted pretty good.  Here we have spaghetti with tomato sauce and a few slices of eggplant roasted under a broiler and smothered with Parmesan cheese.


And finally we have the most typical of my lazy dinners: some combination of protein, carbs, and vegetables.  This pictures shows sweet potato fries (the highlight of the meal), blanched asparagus, and two hard boiled eggs. This meal is very easy to make with whatever you have in your refrigerator.


So, as you can see, I do not cook intricate meals every day.  I do try, however, to eat fresh, non-processed foods as much as possible.  With a few minutes of prep time, a few basic ingredients left over in the fridge can turn into a pretty decent meal. What are your favorite fast meals?

Wednesday, April 18, 2012

Black Bean Burgers


The other day I was craving a veggie burger. I used to eat them all the time with my roommate in college. By all the time, I mean I lived on veggie burgers and fajitas sophomore year. So, while I was at the grocery store last week, I took a look at the frozen veggie burgers.  There is now quite a selection, ranging from vegetable burgers to bean burgers to soy burgers, and on and on.  Each box boasted its positive nutritional facts on the front of the box.  Once I flipped the box over, to look at the nutritional labels and try to narrow down my selection, I realized that all of the burgers were FULL of preservatives and unnatural ingredients that I couldn't pronounce.  Needless to say, I decided to make my own burger.

The inspiration for this particular black bean burger came from another blog, The Bipolar Bon Vivant.  You can find her recipe here: http://bipolarbonvivant.blogspot.com/2012/02/some-like-it-hot-spicy-black-bean.html. 

The ingredients for this burger are very similar to those that went into my taco salad:
  • 1 can black beans, drained and rinsed
  • 1/2 cup frozen corn, thawed
  • 1/3 cup onion
  • 1 chipotle pepper
  • 2 cloves garlic
  • 1/2 cup breadcrumbs
  • 1 egg
  

The first step is to mix everything together.  I did this in two stages.  First, I mashed together the beans, onion, corn, and chipotle pepper with a fork.  I did these ingredients separately in order to make sure that most of the beans were mashed. Then I added in the egg and breadcrumbs.


 Just like with any type of burger, the next step is to form patties with the mixture. I ended up with 5 medium-sized patties.


Then I baked the patties in the oven for about 20 minutes, at 375 degrees, flipping the burgers at the ten minute mark. 

While the burgers were cooking, I sauteed some green bell pepper to top my burger.  In college, the sauteed peppers and onions on top of the burgers were my favorite part.


Although they are not pictured, I also made sweet potato fries to go with my burger.  I put them in the oven a few minutes before the burgers, and they came out at the same time. (I love it when timing works out!)  In the end, these burgers were just okay.  They weren't spectacular, and they didn't suck.  They were nice texture but were a little on the boring side. I do not plan on making this particular recipe again.  However, I have not given up on veggie burgers.  Next up on my list is a chickpea lentil burger.

Vegan/Vegetarian Taco Salad

Normally, I am not a huge fan of tacos.  This weekend, however, I tried fish tacos for the first time ever.  After seeing it on the "How many foods have you tried?" app on Facebook, I knew that I had to try them sooner or later.  It turns out it was sooner, and I was impressed.  The fish tacos I had were made with Tilapia and topped with a mango salsa.  The sweet and salty combo really did it for me. 

I was so intrigued by the  tacos that I decided to make my own version of tacos.  They were very simple to make, and the whole process took about fifteen minutes.  For the filling I mixed together:
  • 1 can of drained, rinsed black beans
  • 1/2-1 cups cooked frozen corn
  • 1 diced tomato
  • 1 diced avocado
  • 1/2 chopped green pepper
  •  1 diced jalapeno pepper
  • a generous amount of fajita seasoning (I had some leftover homemade mix in the cabinet from fajitas, but a purchased packet would work too.)

Then, because I wanted to be a little creative, I baked tortillas into taco bowls.  The inspiration for the bowls came from the Skinny Bitch cookbook, that it probably seems like I am obsessed with by now.  To bake the shells into a bowl, first I microwaved them for 30 seconds to loosen them up.  Then, I formed them into a bowl shape using a muffin tin.  I baked them in the muffin tin at 350 degrees for ten minutes.  After the bowls were nice and crisp, I took them out of the oven and put my filling (along with a little lettuce) into the bowl.

I made two versions of the taco salad: one vegan, one vegetarian.  Can you guess what the difference is?


The only difference between the two is a sprinkle of cheese on top.  I ate both versions, and honestly, the cheese made little to no difference in the enjoyment of this meal.  Both versions were fantastic.  I will definitely make this recipe again!

Wednesday, April 11, 2012

Japchae and Kimchi


Kimchi seems to be one of those foods that people either love (with a passion) or hate (with a passion).  I am on the loving front. I was first introduced to Korean food about 15 years ago, when I took piano lessons in Rockville, MD.  In the same plaza as the piano store, there was a little Korean restaurant we used to go to after lessons. I don't know the real name of the restaurant, and it is unfortunately no longer there.  My family called the restaurant "noodle man" because there was a window into the kitchen where we used to watch a man make noodles. It was here that I first fell in love with Korean food.  

One of the staples of Korean food is kimchi.  Kimchi comes in many varieties, but is most frequently (in my American experience at least) spicy pickled cabbage.  It can be bought in Korean grocery stores for just a few dollars, or in American grocery stores for much more.  Inspired by the sale on cabbage (30 cents/pound!), I decided to take a stab at making my own kimchi, using a spice packet from an Asian supermarket.

 The first step was to soak the vegetables (cabbage and radishes) overnight in salt water.


The next morning, I rinsed the vegetables and mixed them with the spice packet.  Then, I put them back in the refrigerator to cure for two more days.


 As you can see, while curing the vegetables shriveled up, taking up about 2/3 of their original space.


The kimchi smelled spot-on, spicy and tangy.  However, after tasting the kimchi, I realized that my calculations were off.  I used twice as much salt in the first soak as was recommended.  The kimchi turned out extremely salty.  I will have to try this again, paying closer attention to the instructions.  

To make up for my failed kimchi, I decided to try my hand at another Korean dish: japchae.  Contrary to many people's preconceived notions, not all Korean food is spicy.  Japchae is a pretty mild noodle and vegetable dish.  The first step in making my japchae  was to boil noodles.  Traditionally, japchae is made with sweet potato noodles.  I did not have any sweet potato noodles, nor have I ever seen any sweet potato noodles, so I used mung bean noodles instead.  Rice noodles would work fine as well.


While the noodles were cooking, I cut up the vegetables I had on hand: green bell pepper, scallions, and onion, along with some tofu.  This was not the most exciting vegetable combination ever.  If I had planned to cook this dish, I would have picked up more vegetables.  While I do not know what vegetables traditionally go into japchae, I think that mushrooms, peppers, snap peas, carrots, or any other colorful vegetable would go well in this dish.


In a large pan, I sauteed the vegetables with garlic in olive oil (obviously),  sesame oil and soy sauce.  After the noodles were cooked, I drained them and tossed them in sesame oil and soy sauce, and added a little raw cane sugar. Then, I combined the noodles with the vegetables in the large pan and added even more sesame oil and soy sauce.


The recipe I used, modified from a post on www. herbivoracious.com,   created a ton of food.  I happily had japchae for lunch most of the week.  It was especially good when spiced up with some sriracha!

Tuesday, April 3, 2012

Baked French Toast


I'm addicted to breakfast foods.  I have brinner (breakfast for dinner) almost every week.  My favorite breakfast foods can be prepared ahead of time, allowing for an extra fifteen minutes of sleep.  This baked French toast is a perfect example. See my post on overnight oats for another make-ahead breakfast dish.

Baked French toast is made very similarly to traditional pan-fried French toast.  The first step is the essential difference: cutting up the bread into cubes. Arrange the bread cubes in a pre-sprayed pan (or two). I cut up four pieces of bread, which yielded two generous servings.


Then, mix up the batter, just as you would for any French toast recipe: eggs, milk, cinnamon, vanilla, and nutmeg. I included a banana in this batch as well for extra flavor.


 Next, pour the batter over the bread and gently mix until all of the bread is moist.


Bake in the oven at 350 degrees for about twenty minutes, or until the mixture has set up.


Voila! As you can see, I baked my French toast in two individual dishes.  The individual dishes were super convenient to take to work.  Once microwaved for 30-45 seconds, the French toast is delicious with syrup, or even on its own. 

The inspiration for this recipe came from another blog: http://jeanetteshealthyliving.com/2012/03/strawberry-banana-french-toast-casserole-recipe-secret-recipe-club.html.  I did not have any strawberries on hand when I made this recipe, so I omitted them.  I am also not a big fan of strawberry-banana combinations, but I'm sure this would be delicious with any type of fruit!


Kale chips

Kale seems to be one of the newest "super foods."  You know, those foods that are low in fat and high in everything good for you imaginable? Anyways, I've been seeing a lot of recipes for kale chips online lately, so I decided to give them a try. I had never eaten, much less bought, kale before, so it took me a few minutes to find it in the produce section.  In case you decided to try this recipe, here's a hint.  I don't know if all kale is like this, or if my grocery store had a wimpy selection, but this bunch looks rather limp to me.


 Kale chips are actually really easy to make.  The first thing to do is cut or tear the kale into chip-sized pieces (interpret that with liberty), making sure to avoid the stems. Then, place the kale pieces on a baking sheet and toss them lightly with olive oil and salt.  Bake at 275 degrees for about 15 minutes, or until crispy. This is what the chips look like before going into the oven.


I forgot to take a picture of the finished chips.  Basically, they look the same but a little smaller and shriveled.  While having a consistency similar to sheets of seaweed, the chips were surprisingly tasty.   The coarse salt and crispiness of the chips makes them seem like traditional potato chips.  Make sure to eat the chips right away.  I discovered the hard way that if you put them in a plastic baggie to take to lunch they turn mushy.

Have any of you tried kale chips?  What do you think?