Showing posts with label vegetable. Show all posts

Wednesday, November 7, 2012

Butternut Squash Pasta


At work we used to have a lunch club.  Every other week, someone would bring in a dish for the group to eat.  The cook rotated, so everyone got to enjoy new recipes and someone else's cooking.  My coworker Sarah Catherine brought in this butternut squash pasta. It was so good that I later asked her for the recipe so that I could make it myself. The recipe can be found here

The first step in making this pasta dish is to roast the butternut squash.  Cutting up the squash was probably the most difficult part of making this dish.  I lined a baking sheet with foil to minimize my clean-up and then tossed the cubed butternut squash with rosemary, salt, and pepper.  I baked the squash in the oven for about 45 minutes. 


While that cooked, I started on the sauce that would eventually pull the dish together.  First, I sauteed some scallions in olive oil while also preparing pasta according to the package. Hopefully I don't have to explain how to do that...


The next step is a little more complicated though.  Because I don't have a double boiler, I made my own contraption out of a frying pan on top of a sauce pan. The point of a double boiler is to avoid direct heat.  By putting water in the sauce pan, the frying pan receives indirect heat, reducing the risk of burning your sauce. I started off with a combination of salt and flour.


Then I added milk and stirred until the sauce started to thicken.  The flour helps with that process.  Next I added provolone cheese to the mixture. 


Once that was melted, I transferred my sauce to a sauce pan... 


...and stirred in the cooked pasta. At this point, the pasta was essentially macaroni and cheese.


Then I transferred everything to a oven-safe baking dish and topped the pasta with the butternut squash and scallions.  The final touch was to add some parmesan cheese.  You can never have enough cheese, right?


I baked the dish in the oven for about ten minutes, or until the parmesan cheese on top was melted.  Judging by this picture, I probably could have left it in the oven for a few more minutes.  But, alas, I was hungry and it smelled amazing.  I couldn't help myself, so I took it out and dug in. 


This dish is indulgent and delicious.  The recipe suggests adding bacon as well.  You can't go wrong with bacon, so I'm sure that is a great addition.  I'm so glad my coworker introduced me to butternut squash pasta!


Sunday, October 21, 2012

Vegetarian Pot Pie


I kicked off my fall recipes with pumpkin baking.  Now that it's starting to actually  get colder, here's a hearty pot pie recipe.  It's from the Skinny Bitch cookbook, pictured below.  The main ingredients are also pictured below: pie crust, flour, milk (non-dairy if you want a vegan recipe), oil, butter (margarine if you want a vegan recipe) and vegetables.  Here I used onion, carrots, peas, and broccoli, but any vegetables would do.  


There are three parts of this pot pie: vegetables, crust, and base. The first step in making this vegetarian pot pie is to cook the vegetables.  I started by sauteing the onion and carrots. 


Next, I added in the broccoli and frozen peas. 


Next up is the broth, or base for the pot pie. This is the unhealthy part.  First, I melted a stick up butter.


Then, I stirred in some flour to thicken it up. 


The third ingredient in this base was milk.  I stirred it into the butter and flour mixture. 


Once the vegetables and base were ready I mixed them together.  This will be the filling in the pot pie. 


This recipe was designed to make one standard pie-sized pot pie. Instead, I made two smaller pies.  They were meant to be individual servings, but really each pie had 2-3 servings in it. 


After the filling was in its dishes, I covered them with pie crust, pinching at the edges in an attempt to make it pretty. 


Then I baked it in the oven until the crust was golden brown. 


And voila, that is how you make pot pie.  Despite being vegetarian (and vegan with a few modifications), this pot pie tasted just how I remembered it. With a buttery, flaky crust, this dish is best served fresh out of the oven.


Tuesday, October 2, 2012

Vegan sweet potato and chickpea tacos

Who ever thought of making a taco out of sweet potatoes and chickpeas?  Not me!  This recipe was originally intended to be Black Bean and Yam Tacos from the Skinny Bitch cookbook that I love.  It turned out that I was out of black beans, so I subbed chickpeas, and it worked! These tacos were super simple to make and full of yummy vegetables.

The first step was to saute a sweet potato until soft.


Then, I added a diced green bell pepper, and spices: garlic, cumin, coriander, chile powder, and oregano and sauteed some more. 


Next up I added a diced tomato and a can of rinsed chickpeas and sauteed until warmed through.


Finally, I sliced up an avocado and spooned the mixture into a whole wheat tortilla. These tacos surpassed my expectations.  They had great flavor, a fajita-like texture, and were full of nutrients.  I bet they would be good with other vegetables as well.  Corn and squash are two easy additions that come to mind.  Have you ever made meatless tacos? 


Thursday, September 20, 2012

Vegan/Vegetarian Chili


Now that it's getting chillier outside, I think it's appropriate to start making soups again. My second soup of the season (after the vegetarian French onion soup) is Emeril's vegan chili.  The exact recipe can be found here

Like all great recipes, this one starts off by sauteing onions and garlic in oil.  Bell pepper and hot peppers are also thrown in at this point.  


Chili is essentially made by adding things to a pot. It can't get much easier than that.  After the onions and peppers soften, add zucchini, corn, and mushrooms.  I used fresh zucchini and mushrooms and frozen corn. 


After that cooks, the next set of ingredients to add includes diced tomatoes and spices.  I used a mixture of fresh and canned tomatoes. The spices, centered around chili powder, of course, are chili powder, cumin, cayenne pepper, and salt. 


The final additions are black beans (and lots of them!), vegetable stock, and tomato sauce. Bring the chili to a boil, and then let it simmer for at least 20 minutes.  The longer the chili cooks,the more developed the flavors will become.

You can use either canned beans or prepared dried beans.  I used dried beans for the first time ever.  They are a fraction of the cost of canned beans and lower in sodium, but take some preparation.  They must be either soaked overnight or briefly boiled and soaked for an hour or two.  Make sure you properly soak your beans if you are using dried ones.  I did not soak mine long enough, so they had a bit of a crunch to them.

Despite the texture issue with the beans, this chili was great.  I have made it before with canned beans, and both are equally tasty.  This chili freezes well and couldn't be better for you.  It's nothing but beans and vegetables!


Monday, September 10, 2012

French Onion Soup


In my very first blog post, I told I story about eating homemade French onion soup in Paris.  Since I no longer eat very much meat, I decided to make a vegetarian version, completely from scratch.

Here you can see my ingredients: 3 onions,  butter, and homemade vegetable broth (see post here), plus Swiss cheese and French bread to go on top.  The first step to making French onion soup is to prepare  the onions by slicing them thinly.


Next, place the butter in a large sauce pan and let it melt.  Add the onions. Don't worry, they will condense down.


Cook the onions until they start to brown.  I think this process took almost an hour. When they are ready they should look like this:


Then, add the vegetable broth.  I added one quart of homemade vegetable broth. My soup ended up very thick, so I would recommend adding a little more broth.  My broth was very flavorful already, but feel free to add some spices at this point, to your taste.


Let the soup simmer for about twenty minutes.  The longer you cook it, the more the flavor will develop.  I found that the soup was much better the second day, after the flavors had time to meld in the fridge overnight.

Either way, here comes the best part of French onion soup. Pour your desired serving size into an oven-proof bowl.  Place a slice of French bread and Swiss cheese on top.  Then, put the entire bowl into the oven and broil on high for just a minute.  The soup will come out with a nice gooey cheesy bread on top.  Voila, that's how you make French onion soup....from start to finish!


Tuesday, September 4, 2012

Broccoli and Seitan with Black Bean Sauce


Going out to eat as a vegetarian or vegan can be very difficult.  While lots of foods appear to be meat-free, many are cooked in a meat-based broth.  This week I decided to make my own vegan broccoli and seitan with black bean sauce, inspired by one of my favorite Chinese dishes: chicken with black bean sauce.  The recipe for this dish was adapted from CookingLight Way to Cook Vegetarian's Seitan Stir-Fry with Black Bean Garlic Sauce.

My first step was to mix together the sauce: water, rice wine, flour, and store-bought black bean garlic sauce. After I set this aside, I stir fried a package (8oz) of seitan in oil.


After the seitan started to brown, I removed it from the pan and added garlic, ginger, and broccoli to the pan, which I cooked until the broccoli was no longer crunchy. 


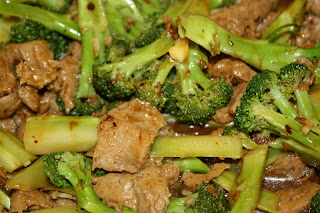
Then, I added back in the sauce and seitan and cooked until heated through.  That's all it took!  This stir fry was awesome.  It had great flavor and was super easy to put together, thanks to the prefab black bean sauce. I served it with brown rice to create a well-balanced dinner, complete with protein (seitan has a ton!), complex carbs, and vegetables. Yum yum yum. It was also great for lunch the next two days.  Have you ever tried seitan?


Monday, August 13, 2012

Sweet Potato and Beet Hash Browns


With the rest of my beets, I decided to make beet hash browns.  Again, here I essentially treated the beets as potatoes, and actually mixed them with some sweet potatoes.  I started with one sweet potato and two beets:


To make the hash browns, I chopped the potatoes and beets into approximately 1/2 inch pieces and sauted them in a pan with olive oil, onion, salt and pepper until soft.


I ate them with fried eggs.  These sweet potato and beet hash browns were heavier than normal potato hash browns, but had a ton of visual interest and interesting texture.  I thought this was a great way to use up some beets.  But beware, this makes a lot of food. Hope you're hungry!


Tuesday, August 7, 2012

Oven roasted beets

Earlier in the summer my aunt gave me some beets from the farmers market.  I had never eaten beets before, much less cooked them, so I searched around the internet for some recipes.  My first beet treat was oven roasted beets.  Basically, I pretended that I was making oven roasted potatoes but used beets instead.  Here are the four golden beets I used, already trimmed.


When I cut them open I noticed that they had really neat designs on the inside, kind of ling the rings on an old tree:


I sliced the beets into chunks that were approximately 1" big.  Then I tossed them in olive oil, cumin, and cayenne pepper and baked them in the oven.


The beets turned out nice and crisp, just like oven roasted potatoes should.  They were quite tasty--like potatoes, but a little earthier, with more flavor.  I assume more nutrients too, but I haven't looked that one up... 


Sunday, July 29, 2012

Multigrain Pasta Salad


A couple of months ago, my mom gave me this bag of mixed grains from Trader Joe's.  It contains couscous, orzo, baby garbonzo beans, and quinoa.  You might have noticed by now that I don't eat a lot of pasta, or carbs in general.  It took me a while to get around to it, but eventually I made a pasta salad out of it. 
 

Here are the vegetables that I used in the salad: eggplant, red onion, and green bell pepper.


I chopped them up and roasted them in the oven until lightly browned.  


I also used some fresh herbs from my dad's garden and my own mini garden on the stoop: basil, oregano, rosemary, and more basil. The herbs were not roasted, but only minced.


While the vegetables were roasting, I cooked the pasta mixture, as specified on the package.  Basically, I boiled it for a few minutes.


 After everything was done cooking, I simply mixed everything together to form the salad. You could add a little olive oil and balsalmic dressing, but I thought the vegetables and fresh herbs gave the dish plenty of taste. This pasta salad can be eaten warm, at room temperature, or cold.  It would be a great healthy dish to take to a picnic or potluck!