Tuesday, September 25, 2012

Pumpkin Cornbread

As you probably noticed last year, I have jumped on the pumpkin band wagon.  My latest venture into the world of baking with pumpkin was some pumpkin cornbread to go with my vegan/vegetarian chili. I found this recipe on Two Peas And Their Pod.  It was the first time I've been disappointed with one of their recipes. I first got concerned when I saw how long the ingredient list was: flour, baking powder, salt, cinnamon, nutmeg, brown sugar, cornmeal, eggs, pumpkin, olive oil, and molasses. 11 ingredients!  


The first step was to mix the dry ingredients together--all 7 of them!


Then I mixed the remaining 4 wet ingredients together and combined them with the dry ingredients, mixing just until moistened.


Next I scooped the batter into greased muffin tins.  The recipe made 12 muffins and some mini muffins. 


After coming out of the oven they looked and smelled great. 


And, as you can see here, they had great texture.  You must be asking yourself at this point why this recipe was a failure. After all, I just said they looked great, smelled great, and had great texture.  The problem was that the taste was off.  Because olive oil was the only fat used in this recipe, the muffins tasted like, well, olive oil. 


I think if I were to try pumpkin cornbread again I would do one of three things: replace the olive oil in this recipe with canola or vegetable oil; find a new recipe that does not use olive oil at all; or use a Jiffy mix and replace some of the wet ingredients with pumpkin.  Have you had any luck with pumpkin cornbread?

Thursday, September 20, 2012

Vegan/Vegetarian Chili


Now that it's getting chillier outside, I think it's appropriate to start making soups again. My second soup of the season (after the vegetarian French onion soup) is Emeril's vegan chili.  The exact recipe can be found here

Like all great recipes, this one starts off by sauteing onions and garlic in oil.  Bell pepper and hot peppers are also thrown in at this point.  


Chili is essentially made by adding things to a pot. It can't get much easier than that.  After the onions and peppers soften, add zucchini, corn, and mushrooms.  I used fresh zucchini and mushrooms and frozen corn. 


After that cooks, the next set of ingredients to add includes diced tomatoes and spices.  I used a mixture of fresh and canned tomatoes. The spices, centered around chili powder, of course, are chili powder, cumin, cayenne pepper, and salt. 


The final additions are black beans (and lots of them!), vegetable stock, and tomato sauce. Bring the chili to a boil, and then let it simmer for at least 20 minutes.  The longer the chili cooks,the more developed the flavors will become.

You can use either canned beans or prepared dried beans.  I used dried beans for the first time ever.  They are a fraction of the cost of canned beans and lower in sodium, but take some preparation.  They must be either soaked overnight or briefly boiled and soaked for an hour or two.  Make sure you properly soak your beans if you are using dried ones.  I did not soak mine long enough, so they had a bit of a crunch to them.

Despite the texture issue with the beans, this chili was great.  I have made it before with canned beans, and both are equally tasty.  This chili freezes well and couldn't be better for you.  It's nothing but beans and vegetables!


Sunday, September 16, 2012

Tandoori Chicken Sandwiches


I cooked meat this week for the first time in months.  Since I'm training for a half marathon, I need all the carbs and protein I can get.  Brandon and I made tandoori style chicken burgers with a recipe from Martha Stewart.  Do you think Martha actually writes her own recipes anymore?  

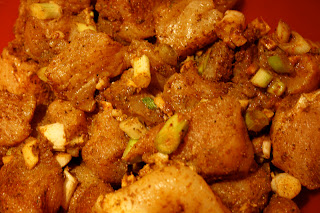
To start off, we marinated chopped chicken breast in lemon juice with a combination of aromatic spices: scallions, ginger, paprika, cumin, cardamom, cayenne, salt, and pepper for about half an hour. 


Next, we made the patties.  Have you ever wondered how chicken nuggets get their texture?  Here's the process.  We put the marinated chicken in my magic bullet (the recipe recommended a food processor) until the chicken was aproximately the texture of ground beef.  With this texture, the cooked chicken patties had a burger-like texture.  If you continue pureeing the mixture until smooth, you will end up with a chicken nugget-like texture. 


Then form the chicken into patties.  I made small patties, about 2 inches across, so that I could fit multiple into a pita.  You could also make larger patties for a burger-style sandwich. In this picture you can see the different textures of the patties, some more burger-like and some more chicken nugget-like.


We cooked the patties in a hot skillet with a little oil, flipping them after a few minutes.


Brandon was skeptical of the patties, so he reserved some chicken chunks before they went into the bullet. He cooked them in the oven, under a hot broiler. Here are the pieces.


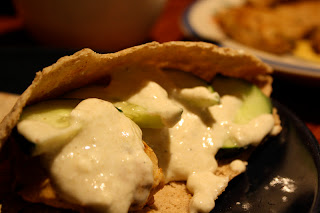
I ate the patties with cucumbers and a cumin yogurt sauce inside whole wheat pitas. The patties were nice and flavorful, reminiscent of chicken tikka. In the sandwich, the yogurt sauce was a cooling partner to the spicy chicken and the cucumber added a nice crunch.  It was a great combination. 


Thursday, September 13, 2012

Pumpkin Granola


Happy Fall! I kicked off the season with a baking spree this weekend.  First on my list was pumpkin granola.  I've made granola before, using nuts and fruit and all kinds of delicious--but expensive--ingredients.  This recipe, from Two Peas and Their Pod, is very simple and inexpensive, and, unlike many recipes, pretty healthy! 

First, mix together the wet ingredients: pumpkin, applesauce, maple syrup, and vanilla.


Then, mix together the dry ingredients: oats, spices, salt, and sugar.


Next, pour the wet ingredients over the dry and mix together until moistened. 


Fingers make great mixers. This would be a lot of fun for a little kid.


Spread out the mixture on a foil or wax paper lined baking sheet and bake in a warm (325 degrees) oven for 40 minutes, mixing up the granola half way through baking. 


The granola should be starting to get crispy.  Don't worry if it is still moist, it will dry out and gain some crunch as it cools.  Stir in dried cranberries, and let cool completely.


This granola is great.  It's easy to make, healthy, and inexpensive.  What more could you want?  Oh, and it tastes awesome.  I plan to eat it with yogurt, but so far I've been too busy eating it out of the jar. 


Monday, September 10, 2012

French Onion Soup


In my very first blog post, I told I story about eating homemade French onion soup in Paris.  Since I no longer eat very much meat, I decided to make a vegetarian version, completely from scratch.

Here you can see my ingredients: 3 onions,  butter, and homemade vegetable broth (see post here), plus Swiss cheese and French bread to go on top.  The first step to making French onion soup is to prepare  the onions by slicing them thinly.


Next, place the butter in a large sauce pan and let it melt.  Add the onions. Don't worry, they will condense down.


Cook the onions until they start to brown.  I think this process took almost an hour. When they are ready they should look like this:


Then, add the vegetable broth.  I added one quart of homemade vegetable broth. My soup ended up very thick, so I would recommend adding a little more broth.  My broth was very flavorful already, but feel free to add some spices at this point, to your taste.


Let the soup simmer for about twenty minutes.  The longer you cook it, the more the flavor will develop.  I found that the soup was much better the second day, after the flavors had time to meld in the fridge overnight.

Either way, here comes the best part of French onion soup. Pour your desired serving size into an oven-proof bowl.  Place a slice of French bread and Swiss cheese on top.  Then, put the entire bowl into the oven and broil on high for just a minute.  The soup will come out with a nice gooey cheesy bread on top.  Voila, that's how you make French onion soup....from start to finish!


Tuesday, September 4, 2012

Broccoli and Seitan with Black Bean Sauce


Going out to eat as a vegetarian or vegan can be very difficult.  While lots of foods appear to be meat-free, many are cooked in a meat-based broth.  This week I decided to make my own vegan broccoli and seitan with black bean sauce, inspired by one of my favorite Chinese dishes: chicken with black bean sauce.  The recipe for this dish was adapted from CookingLight Way to Cook Vegetarian's Seitan Stir-Fry with Black Bean Garlic Sauce.

My first step was to mix together the sauce: water, rice wine, flour, and store-bought black bean garlic sauce. After I set this aside, I stir fried a package (8oz) of seitan in oil.


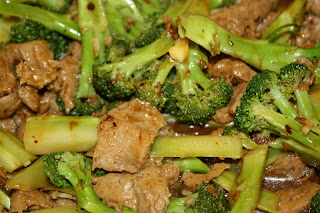
After the seitan started to brown, I removed it from the pan and added garlic, ginger, and broccoli to the pan, which I cooked until the broccoli was no longer crunchy. 


Then, I added back in the sauce and seitan and cooked until heated through.  That's all it took!  This stir fry was awesome.  It had great flavor and was super easy to put together, thanks to the prefab black bean sauce. I served it with brown rice to create a well-balanced dinner, complete with protein (seitan has a ton!), complex carbs, and vegetables. Yum yum yum. It was also great for lunch the next two days.  Have you ever tried seitan?


Monday, September 3, 2012

Gnocchi


In my limited experience, gnocchi is typically served in fancy Italian restaurants with a creamy sauce.  Many people think that because of this, gnocchi is expensive and difficult to make.  That couldn't be farther from the truth.  Gnocchi is made from just three ingredients that you probably already have in your kitchen:  potatoes, flour, and eggs.  This recipe, which made enough for 6 or 8 servings, cost under 5 dollars to make.


The first step in making gnocchi is to peel potatoes.  The number of potatoes depends on how much gnocchi you want to make.


Next, cut the potatoes into chunks and boil them, as if you were making mashed potatoes. The smaller you cut the potatoes, the faster they will cook. 


Then, mash the potatoes.  I went old school and used a fork, but a potato masher or ricer would work well too. 


Once the potatoes are sufficiently mashed, the next step is to form a dough.  To do so, mix the mashed potatoes with flour and egg.  Again, this recipe is easily adaptable to large quantities, so the amount of flour and number of eggs depends on how many mouths you want to feed. 


I mixed up my dough on the counter using my hands.  This seemed to be the easiest method. As you can see, two potatoes makes a lot of dough.  Once the dough is formed, roll it out into long skinny rods.   The gnocchi expands a little while cooking, so make the rods slightly smaller than your intended gnocchi thickness. 


Cut the rod into sections that are a little less than an inch long.  Then, to get the special gnocchi shape, gently press a fork into the dough forming ridges. 


The gnocchi are now ready to be cooked.  Start a pot of water boiling on the stove and prepare an ice bath for the gnocchi. 


In small batches, toss the gnocchi into the boiling water.  They cook remarkably fast, in just a few minutes.  Once they float to the surface they are cooked.  Place them into the ice bath to prevent further cooking.


Repeat this process until the dough has all become gnocchi. Two potatoes create a lot of pasta. The gnocchi do freeze well, so feel free to make extra for later.  


Does the simplicity of this recipe surprise you?  Will you still spend $20 at a restaurant for a plate of potatoes and flour?  I don't think I will...


Here I served the gnocchi in a homemade pesto sauce--recipe coming soon!